Maximizing GPU Efficiency: Setting Up MIG on Nvidia H100 in Kubernetes

Table of Contents
- Introduction
- Prerequisites
- MIG Concepts & H100 Specifics
- Enabling MIG on the H100
- Integrating MIG with Kubernetes using the GPU Operator
- Real-World Use Case: Multi-Tenant GPU Efficiency with MIG
- Conclusion
Introduction
Modern AI and machine learning workloads often require powerful GPUs, but not every task needs the full capacity of a high-end card like the Nvidia H100. In multi-tenant environments—where multiple users or teams share the same hardware, this can lead to significant GPU underutilization, wasted resources, and increased operational costs.
Nvidia's Multi-Instance GPU (MIG) technology addresses these challenges by allowing a single GPU to be partitioned into multiple, fully isolated instances. Each instance behaves like a separate GPU, enabling true multi-tenancy and much higher efficiency. This not only maximizes your hardware investment but also contributes to sustainability by reducing the need for additional GPUs and lowering energy consumption.
In this post, we'll walk through how to set up and use MIG on the Nvidia H100 in a baremetal Kubernetes cluster, so you can maximize your GPU investment, enhance efficiency, and run diverse workloads side by side.
What you'll learn:
- What MIG is and how it works on the Nvidia H100
- How to enable and configure MIG for multi-tenancy
- How to set up MIG in a baremetal Kubernetes cluster using the GPU Operator
- How MIG can improve efficiency and sustainability in your infrastructure
Prerequisites
Before you begin, make sure you have the following:
- A baremetal Kubernetes cluster (Kubernetes v1.25 or newer recommended)
- At least one node equipped with an Nvidia H100 GPU
- Nvidia GPU drivers installed and compatible with the H100
- Helm installed on your management workstation
- kubectl access to your Kubernetes cluster
- (Optional) Basic familiarity with Linux and Kubernetes concepts
For setup instructions, refer to the official documentation:
Once you have these prerequisites in place, you'll be ready to enable and configure MIG on your H100 GPU within Kubernetes.
Supported GPUs
Not all the Nvidia GPUs support MIG, so be careful when you decide to buy one. In the official Nvidia documentation you can find out the supported GPUs
MIG Concepts & H100 Specifics
Nvidia's Multi-Instance GPU (MIG) technology allows a single physical GPU to be split into multiple, fully isolated GPU instances. Each instance has its own dedicated memory, compute cores, and resources, enabling multiple users or workloads to share a single GPU without interfering with each other.
Partitioning is beneficial for workloads which do not fully saturate the GPUs compute capacity, a lot of GPU workloads do not require a full GPU, so if you are doing a POC likely you don't need 94gb og GPU memory by your Nvidia H100. Without GPU partitioning, there is no room for multi tenancy and you would need to have an entire GPU allocated, using it or not. So similar concept that how Kubernetes handles CPU and Memory, you could set the partitions that best fit your workloads needs.
Why MIG Matters
- Efficiency: Run multiple workloads on a single GPU, maximizing utilization and reducing idle resources.
- Multi-tenancy: Safely share GPU resources between users, teams, or applications.
- Flexibility: Choose the right partition size for each workload, from small inference jobs to large training tasks.
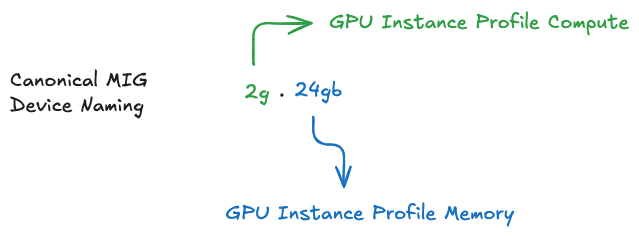
Understanding MIG Device Names
By default, a MIG device consists of a single "GPU Instance" and a single "Compute Instance". The following table highlights a naming convention to refer to a MIG device by its GPU Instance's compute slice count and its total memory in GB (rather than just its memory slice count).
When only a single CI is created (that consumes the entire compute capacity of the GI), then the CI sizing is implied in the device name.
H100-Specific Capabilities
The Nvidia H100 supports a wide range of MIG profiles, allowing you to tailor GPU partitions to your needs. For example, you can create up to 7 separate GPU instances on a single H100, each with different memory and compute allocations.
Below is a table of available MIG profiles for the H100:
+-----------------------------------------------------------------------------+
| GPU instance profiles:                                                      |
| GPU   Name             ID    Instances   Memory     P2P    SM    DEC   ENC  |
|                              Free/Total   GiB              CE    JPEG  OFA  |
|=============================================================================|
|   0  MIG 1g.12gb       19     7/7        10.75      No     16     1     0   |
|                                                             1     1     0   |
+-----------------------------------------------------------------------------+
|   0  MIG 1g.12gb+me    20     1/1        10.75      No     16     1     0   |
|                                                             1     1     1   |
+-----------------------------------------------------------------------------+
|   0  MIG 1g.24gb       15     4/4        21.62      No     26     1     0   |
|                                                             1     1     0   |
+-----------------------------------------------------------------------------+
|   0  MIG 2g.24gb       14     3/3        21.62      No     32     2     0   |
|                                                             2     2     0   |
+-----------------------------------------------------------------------------+
|   0  MIG 3g.47gb        9     2/2        46.38      No     60     3     0   |
|                                                             3     3     0   |
+-----------------------------------------------------------------------------+
|   0  MIG 4g.47gb        5     1/1        46.38      No     64     4     0   |
|                                                             4     4     0   |
+-----------------------------------------------------------------------------+
|   0  MIG 7g.94gb        0     1/1        93.12      No     132    7     0   |
|                                                             8     7     1   |
+-----------------------------------------------------------------------------+
For a visual representation, the diagram below shows a representation of how to build all valid combinations of GPU instances:
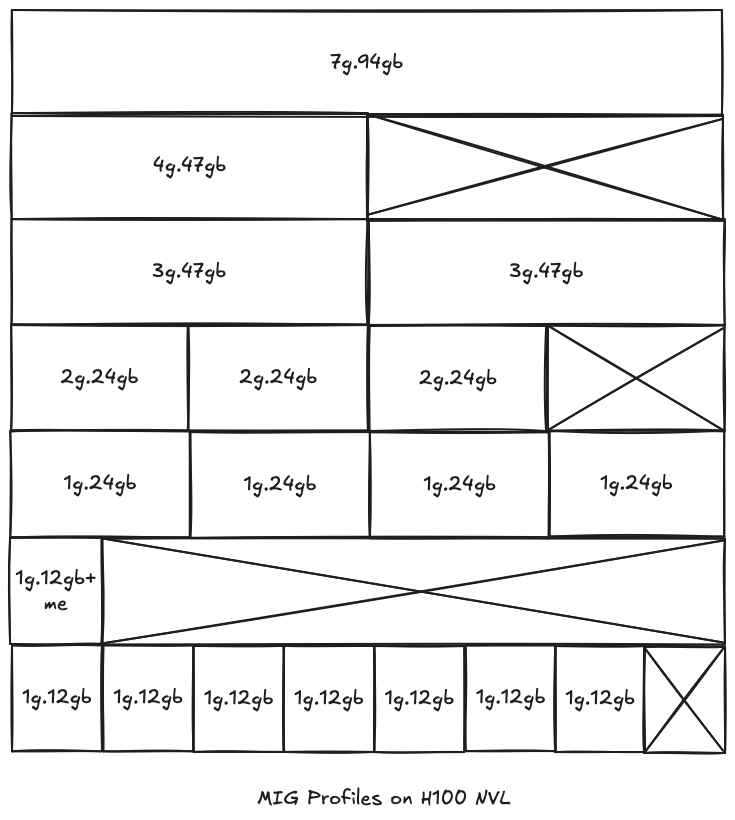
With MIG, you can right-size your GPU resources, improve efficiency, and enable secure, multi-tenant workloads on the powerful H100.
Enabling MIG on the H100
To take advantage of MIG on your Nvidia H100, you first need to enable MIG mode on the GPU. Here's how to do it step by step:
1. Install Nvidia Drivers and Tools
Make sure you have the latest Nvidia drivers and the nvidia-smi tool installed on your GPU node. You can verify this by running:
nvidia-smi
You should see your H100 GPU listed in the output.
2. Enable MIG Mode
Enable MIG mode on your H100 GPU with the following command (replace 0 with your GPU index if needed):
sudo nvidia-smi -i 0 -mig 1
You should see a confirmation message indicating that MIG mode is enabled. A reboot may be required for the change to take effect.
3. Reboot the Node (if required)
If prompted, reboot your node to apply the changes:
sudo reboot
4. Verify MIG Mode
After rebooting, verify that MIG mode is enabled:
nvidia-smi
You should see MIG Mode: Enabled in the output for your H100 GPU.
5. List Available MIG Profiles
To see the supported MIG profiles for your GPU, run:
nvidia-smi mig -lgip -i 0
This will display all the available partitioning options for your H100.
For more details, refer to the official Nvidia MIG User Guide.
Once MIG mode is enabled, you're ready to integrate it with Kubernetes and start partitioning your GPU for multi-tenant workloads.
Integrating MIG with Kubernetes using the GPU Operator
Once MIG mode is enabled on your H100, you can manage and orchestrate GPU partitions directly from Kubernetes using the NVIDIA GPU Operator. This operator automates the deployment and management of all necessary components for GPU workloads, including MIG configuration.
1. Add the NVIDIA Helm Repository
First, add the official NVIDIA Helm chart repository:
helm repo add nvidia https://nvidia.github.io/gpu-operator
helm repo update
At the time this post has been written this is the v25.3.0 is the latest GPU Operator Helm Chart version
2. Install the GPU Operator
Install the GPU Operator in your cluster:
helm install --wait --generate-name nvidia/gpu-operator
This will deploy the operator and all required components.
3. Enable and Configure MIG Strategy
You can configure the operator to use a mixed or single MIG strategy.
- Single: All MIG instances on a GPU are of the same size/type
- Mixed: MIG instances on a GPU are of different sizes/types
For custom partitioning, use the "mixed" strategy and provide a custom configuration. Here's an example values.yaml for a custom MIG setup:
mig:
  strategy: "mixed"
migManager:
  env:
    - name: WITH_REBOOT
      value: "true"
  config:
    name: custom-mig-config
    create: true
    data:
      config.yaml: |-
        version: v1
        mig-configs:
          custom-mig:
            - devices: [0]
              mig-enabled: true
              mig-devices:
                "1g.12gb": 2
            - devices: [1]
              mig-enabled: true
              mig-devices:
                "1g.24gb": 1
                "1g.12gb": 5
Apply the custom configuration by upgrading the operator:
helm upgrade -f values.yaml <release-name> nvidia/gpu-operator
4. Label Nodes for MIG Configuration
Label your nodes to apply the custom MIG profile:
kubectl label nodes <your-node-name> nvidia.com/mig.config=custom-mig --overwrite
5. Verify MIG Configuration
Check MIG Manager logs
Confirm that MIG Manager completed the configuration by checking the MIG Manager logs:
time="2025-06-05T09:54:27Z" level=debug msg="Walking MigConfig for (devices=[0])"
time="2025-06-05T09:54:27Z" level=debug msg="  GPU 0: 0xXXXXXXXX"
time="2025-06-05T09:54:27Z" level=debug msg="    MIG capable: true\n"
time="2025-06-05T09:54:27Z" level=debug msg="    Updating MIG config: map[1g.12gb:2]"
time="2025-06-05T09:54:27Z" level=debug msg="    Skipping -- already set to desired value"
time="2025-06-05T09:54:27Z" level=debug msg="Walking MigConfig for (devices=[1])"
time="2025-06-05T09:54:27Z" level=debug msg="  GPU 1: 0xXXXXXXXX"
time="2025-06-05T09:54:27Z" level=debug msg="    MIG capable: true\n"
time="2025-06-05T09:54:27Z" level=debug msg="    Updating MIG config: map[1g.12gb:5 1g.24gb:1]"
time="2025-06-05T09:54:31Z" level=debug msg="Running apply-exit hook"
Check Node Labels
Check the status of the MIG Manager and node labels to confirm the configuration:
kubectl get nodes --show-labels
You should see labels like nvidia.com/mig.config=custom-mig and nvidia.com/mig.config.state=success.
  "nvidia.com/gpu.product": "NVIDIA-H100-NVL",
  "nvidia.com/gpu.replicas": "0",
  "nvidia.com/gpu.sharing-strategy": "none",
  "nvidia.com/mig-1g.12gb.count": "7",
  "nvidia.com/mig-1g.12gb.engines.copy": "1",
  "nvidia.com/mig-1g.12gb.engines.decoder": "1",
  "nvidia.com/mig-1g.12gb.engines.encoder": "0",
  "nvidia.com/mig-1g.12gb.engines.jpeg": "1",
  "nvidia.com/mig-1g.12gb.engines.ofa": "0",
  "nvidia.com/mig-1g.12gb.memory": "11008",
  "nvidia.com/mig-1g.12gb.multiprocessors": "16",
  "nvidia.com/mig-1g.12gb.product": "NVIDIA-H100-NVL-MIG-1g.12gb",
  "nvidia.com/mig-1g.12gb.replicas": "1",
  "nvidia.com/mig-1g.12gb.sharing-strategy": "none",
  "nvidia.com/mig-1g.12gb.slices.ci": "1",
  "nvidia.com/mig-1g.12gb.slices.gi": "1",
  "nvidia.com/mig-1g.24gb.count": "1",
  "nvidia.com/mig-1g.24gb.engines.copy": "1",
  "nvidia.com/mig-1g.24gb.engines.decoder": "1",
  "nvidia.com/mig-1g.24gb.engines.encoder": "0",
  "nvidia.com/mig-1g.24gb.engines.jpeg": "1",
  "nvidia.com/mig-1g.24gb.engines.ofa": "0",
  "nvidia.com/mig-1g.24gb.memory": "22144",
  "nvidia.com/mig-1g.24gb.multiprocessors": "16",
  "nvidia.com/mig-1g.24gb.product": "NVIDIA-H100-NVL-MIG-1g.24gb",
  "nvidia.com/mig-1g.24gb.replicas": "1",
  "nvidia.com/mig-1g.24gb.sharing-strategy": "none",
  "nvidia.com/mig-1g.24gb.slices.ci": "1",
  "nvidia.com/mig-1g.24gb.slices.gi": "1",
  "nvidia.com/mig.capable": "true",
  "nvidia.com/mig.config": "custom-mig",
  "nvidia.com/mig.config.state": "success",
  "nvidia.com/mig.strategy": "mixed",
Check nvidia-smi
Run nvidia-smi -L command in the MIG Manager to verify the MIG configuration is correct:
nvidia-smi -L
GPU 0: NVIDIA H100 NVL (UUID: GPU-xxxxxxxx-xxxx-xxxx-xxxx-xxxxxxxxxxxx)
  MIG 1g.12gb     Device  0: (UUID: MIG-xxxxxxxx-xxxx-xxxx-xxxx-xxxxxxxxxxxx)
  MIG 1g.12gb     Device  1: (UUID: MIG-xxxxxxxx-xxxx-xxxx-xxxx-xxxxxxxxxxxx)
GPU 1: NVIDIA H100 NVL (UUID: GPU-xxxxxxxx-xxxx-xxxx-xxxx-xxxxxxxxxxxx)
  MIG 1g.24gb     Device  0: (UUID: MIG-xxxxxxxx-xxxx-xxxx-xxxx-xxxxxxxxxxxx)
  MIG 1g.12gb     Device  1: (UUID: MIG-xxxxxxxx-xxxx-xxxx-xxxx-xxxxxxxxxxxx)
  MIG 1g.12gb     Device  2: (UUID: MIG-xxxxxxxx-xxxx-xxxx-xxxx-xxxxxxxxxxxx)
  MIG 1g.12gb     Device  3: (UUID: MIG-xxxxxxxx-xxxx-xxxx-xxxx-xxxxxxxxxxxx)
  MIG 1g.12gb     Device  4: (UUID: MIG-xxxxxxxx-xxxx-xxxx-xxxx-xxxxxxxxxxxx)
  MIG 1g.12gb     Device  5: (UUID: MIG-xxxxxxxx-xxxx-xxxx-xxxx-xxxxxxxxxxxx)
For more details, see the NVIDIA GPU Operator documentation.
With this setup, your Kubernetes cluster can efficiently schedule and manage multi-tenant GPU workloads using MIG on the H100.
Real-World Use Case: Multi-Tenant GPU Efficiency with MIG
To illustrate the benefits of MIG on the H100 in Kubernetes, let's look at a real-world scenario:
Scenario
A research platform runs a mix of machine learning training, inference, and interactive Jupyter notebooks. Previously, each workload required a dedicated GPU, leading to underutilization and high costs. By enabling MIG on the H100 and integrating with Kubernetes, the team was able to partition a single GPU into multiple isolated instances, each assigned to a different workload or user.
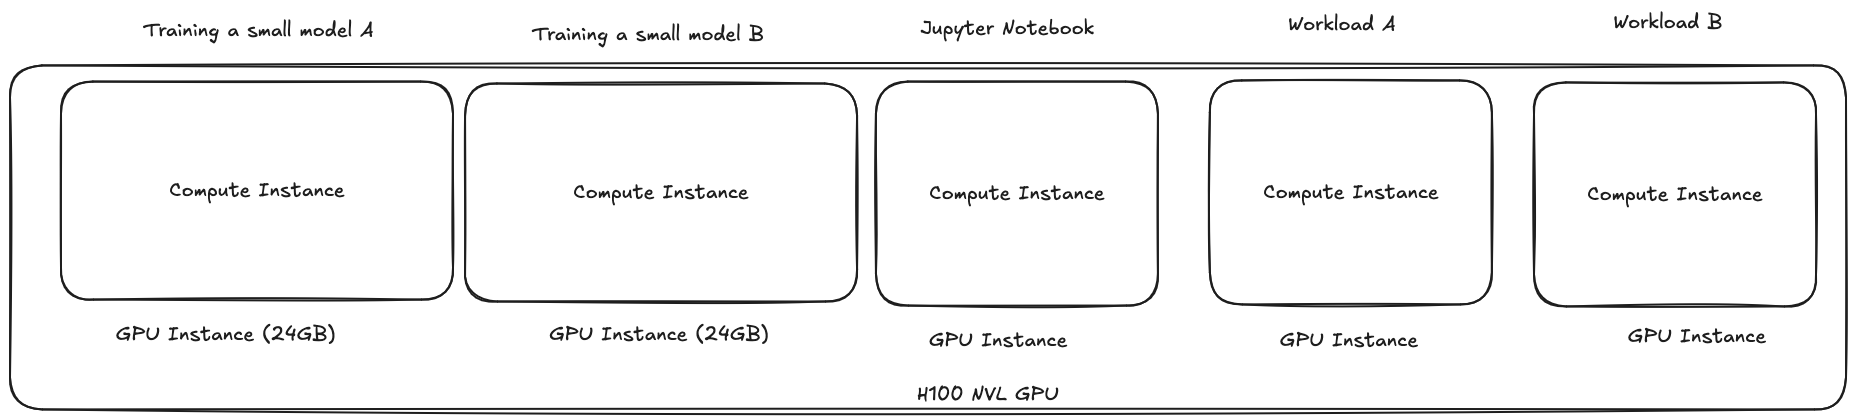
How MIG Improved Efficiency
- Resource Utilization: Instead of leaving large portions of the GPU idle, each MIG instance was right-sized for its workload, maximizing the use of available compute and memory.
- Cost Savings: The team reduced the number of GPUs needed, saving on both hardware and energy costs.
- Sustainability: By running more workloads per GPU, the platform's energy consumption and carbon footprint were significantly reduced.
- User Experience: Data scientists and engineers could run their jobs in parallel without waiting for access to a full GPU, improving productivity.
MIG Basics
- MIG stands for Multi-Instance GPU, a feature on select Nvidia GPUs.
- It allows a single GPU to be partitioned into multiple isolated instances.
- Each instance operates as a separate GPU with its own memory and compute resources.
- This enables true multi-tenancy and better resource utilization.
- Not all Nvidia GPUs support MIG; check compatibility before purchasing.
- Partitioning is ideal for workloads that don't need a full GPU.
- You can assign different MIG instances to different users or workloads.
- MIG improves security and performance isolation between tenants.
- Configuration is managed via nvidia-smi or Kubernetes GPU Operator.
- MIG is especially useful in shared environments like Kubernetes clusters.
Conclusion
Nvidia's MIG technology, especially when paired with the powerful H100 GPU and Kubernetes, unlocks true multi-tenancy, maximizes hardware efficiency, and supports more sustainable infrastructure. By partitioning a single GPU into multiple isolated instances, you can run diverse workloads side by side, reduce costs, and improve resource utilization—all while maintaining a great user experience for your teams.
If you're running AI, ML, or data science workloads in a Kubernetes environment, enabling and managing MIG is a practical way to get the most out of your GPU investment.
Further Reading & Resources:
- Nvidia MIG User Guide
- Nvidia GPU Operator Documentation
- Nvidia Multi-Instance GPU and Nvidia Virtual Compute Server
About the Author
I'm a Platform Engineer Architect specializing in cloud-native technologies and engineering leadership. I focus on building efficient, collaborative engineering processes and documentation. I'm a Golden Kubestronaut with a passion for Cloud Native technologies.
If you have questions, want to share your experience, feel free to connect with me on LinkedIn or contact me for more information.

